A new FREE pattern from Eucalan: Fancy Leaves Scarf by Michael Harrigan

We’re thrilled to announce that we’re now offering a new pattern, the Fancy Leaves Scarf by Michael Harrigan, for FREE when you sign up for our newsletter

We’ve interviewed Michael in the past, but today he answered a few more questions about his design process and inspiration. 

A silvery seafoam colored lace shawl is draped over a mannequin, greenery and the blue sky in the background.

An Interview with Michael Harrigan:

Q. Where do you find your design inspiration?

A. I am mostly inspired by nature and the type of stitch patterns I choose for a design depend on whether what I see is best rendered in a selection of colors or more abstractly by openwork or lace knitting.

Q: What was your inspiration for the Fancy Leaves pattern? 

A. Continuing from the question on design inspiration – at times the inspiration starts with a yarn and whether the yarn will be able to yield the desired effect. I knew that the high-twist yarn I used for Fancy Leaves would produce a fabric that highlighted the stitch pattern, providing raised edges around the leaves – and I’m pleased with the effect. 

Q. What have you been up to since we last worked together?

A. I’ve had a few projects in the works, including a cloche-style hat in another Japanese stitch pattern, worked in a new yarn that’s a blend of linen and silk; and a big project that will take a few months, I think – it’s a Fair Isle-style throw/blanket in four quadrants, representing the four seasons. Each quadrant is knit in two colors only, reflecting a pattern color that reminds me of each season. I’m also working on a post-graduate degree program in Scottish History – with a focus on male-dominated knitting dating back to the 16th century. 

Q. What do you like most about being a knitwear designer?

A. I really like being able to experiment with a variety of yarns to see what can be produced given different fiber content – and of course playing with color to see the impact that colors have when worked next to each other: it’s always amazing to me how different a shade can look depending on the color that’s placed next to it.

Q. What else do you wish I had asked you? 

A. I wish you’d asked me about some of my newest designs! 

A collage of three images: on the left, a colurwork cowl with geometric patterning; in the middle a Black man smiles, wearing a mosiac patterned scarf in shades of blues; on the right a warm caramel colored lace scarf is wrapped around a mannequin.

I have three in mind, actually. The first is a Fair Isle neck warmer (available on Ravelry) that I knit in a heavy lace-weight yarn on small needles. It’s the first time I’ve tried this and I really like the effect. 

The second one is a wrap that’s also suitable as a wide man’s scarf. It features three mosaic stitch patterns followed by wide stripes of color separated by garter stitch eyelets: Mosaics and Medallions (available on Ravelry).

The last one is a lace-patterned scarf worked in a heavier yarn, and I call it Shoulder Seasons (available on Ravelry), as it’s a really useful accessory in the fall and early spring! 

Fancy Leaves Scarf

This lacy scarf is knit in a high twist yarn so all the delicate stitches stand out and create a lovely pattern. The rectangular piece is worked from one end to the other with directions that are both charted and written. This would make a lovely gift or a project to spoil yourself with over the winter.

A delicate silver lace scarf is draped over some wooden rods to display its patterning.

A few details:

Yarn: Eden Cottage Yarns BRIMHAM HIGH TWIST (100g, 360/392yds, 85% superwash extrafine merino, 15% nylon) 2 skeins of Silver Birch

Needles: US 2.5 (3mm) 24”/60cm circular knitting needle or size needed to achieve gauge.

Gauge: 21 stitches and 40 rounds = 4″/10 cm in Fancy Leaves stitch pattern.

Download your free copy when you sign up for our email list today!

We hope you enjoy the pattern and can’t wait to see your versions! Please share them with us on social media using the hashtag #eucalan.

Like this post? Pin it!

Infuse Hygge at Home this Winter

Tips for spreading hygge in your home are often focused on décor. But we have a few tips beyond the traditional on how to bring coziness to you this winter.

hygge  ˈhyü-gə:  borrowed from Danish, “comfort, coziness,” invoking or fostering a sense of coziness, contentment, and well-being

Bring the outside in

Pine branches in a simple glass vase with water, a pine cone and candles surround it.

Natural elements are a very important part of the hygge ideology. This is sort of the hygge 101 requirement. While wood and greenery are the most obvious, consider how you might incorporate these in your home during the colder months. Try a handmade fir wreath, festive table garland, pine centerpiece, or artistic branch arrangement for hanging lights. An assortment of natural textures will brighten the spirit of your home.

Add Warm Lighting

A ceranic teapot and teacups rest on a wooden table. A candleabra with three lit candles lends a warm glow.

With colder, cloudier days this season, it can be more difficult to naturally brighten your home. Natural light helps to create hygge, so we need to maximize what we have. Style mirrors in your home opposite windows to bounce sunlight around darker spaces. Soften your lighting by swapping in warm light bulbs around the house. If you’re fortunate enough to own a fireplace, this is the ultimate hygge ambiance lighting. Otherwise, our best budget-friendly solution is to scatter battery-operated candlesticks around the house for safe evening candlelight, while you light your favorite scented candle nearby to create a cozy nightfall routine.

Utilize More Wool

A woman stands wrapped in a wool blanket. Her hair is windblown and she stares off into the distance.

We’re not just saying that because we want you to use more Eucalan! Wool is much warmer than many synthetic fibres, and we know the easiest way to keep warm at home without cranking up the thermostat is to layer up. Wool traps air close to the skin to keep you warmer. It also repels moisture, so it continues to be warm even when it’s raining or snowing. Wool has antibacterial properties, which means it needs less frequent washing. So invest in well-made wool pieces for your home and your wardrobe.

Layer in Textures

A cozy cabin with plush floor rugs, blankets and pillows in an easy chair.

Physical sensation contributes to emotion, so layer in a variety of plush textures throughout your home. Soft sherpa, shaggy furs, and chunky knits fill out a cozy and welcoming space.

Do you have wood or tile floors that are freezing in winter? Add textiles! Layer small rugs and floor cushions to avoid the chill. Stack quilts and blankets at the foot of each bed for extra warmth in the overnight hours. Put festive cushions down if your chairs get chilly, sheepskin throws…all the wonderful warm things.

Find Your Handicraft

A woman reclines on a couch. You see her hands working with a crochet hook and purple yarn.

Handwork and handicraft are often tied into hygge. Find a relaxing hobby that contributes to the sense of coziness you are looking for your space to emulate: Knitting, crocheting, sewing, papercrafts, weaving, etc. You’ll be surprised by how much your own spirits are reflected back onto your environment. Prepare your own comfy cove to work from with your favorite throws and candlelight – So when you settle in with your tools, you are already encouragingly cozy. Your beautiful creations will contribute to your home’s hygge through texture, layers, wool, warmth, etc.

Dabble in the Culinary Arts

A "stovetop potpourri" with oranges and herbs bubbles in a pot.

Cuisine is typically overlooked when studying hygge. However, the mindfulness required to cook or bake is known to reduce stress and promote relaxation. The culinary arts are often described as a form of therapy. In terms of hygge, baking bread or simmering soup add warmth to the kitchen and aroma to your home. If you’re not much of a chef, try your hand at aromatic simmer pots, or “stovetop potpourri” as some call it. The goal is to create a beautiful scent, and you can’t really go wrong.

We hope we’ve given you a few easy and encouraging ways to master hygge this winter. Do you have a favourite tip we missed? Comment here and let us know!

Washing Your Winter Coat with Eucalan

This article originally appeared in January 2017. We’ve updated it today for you!

​​Now that winter is around the corner, it’s time to start getting your coats ready for wear. Whether you realize it or not, little coffee spills, dirt from accidentally brushing up against the car, carrying your kids and walking your pets can all contribute to dirt building up on your winter coat. Eucalan Delicate Wash can make caring for your winter coat so easy, keeping it looking like new and smelling amazing. So today we’re giving you our guide on how to wash your down-filled, wool, or faux fur winter coats! Read on for directions for each.

Important: If you have a suede, fur, or leather winter coat, we recommend that you bring it to a professional for full cleaning. While we do have some tips on how to wash good-condition fur accessories and show you how to spot clean leather, a full cleaning should be left to the professionals.

A woman wearing a down coat and winter hat stands in a field where it is lightly snowing. Her face is upturned.

Down-Filled Coats

  1. Set your washing machine to the delicate cycle, and choose the shortest wash time and cold water setting. If your coat is black or a dark colour, and you have previously washed your normal clothes with a powder detergent, run a rinse cycle of your washing machine before putting your coat gently inside. This will prevent any detergent residue from showing up on your coat.
  2. If there are any visible spots on the coat, apply full strength Eucalan directly to them prior to washing.
  3. Add the contents of one pod or a few capfuls of Eucalan Delicate Wash in your favourite scent.
  4. Once the coat is washed, drying it is the trickiest part. You can dry it in the tumble dryer, but be sure to set the temperature to the lowest option, and for no more than 20 minutes. Putting in a couple of tennis balls or wool dryer balls will help keep the down from clumping together in the coat while it dries, but if you don’t have either, massage the coat in between dryer cycles to help break apart any clumps of down you can feel through the outer shell. Repeat this cycle a few more times to ensure the coat is dry and the down fluffed up.
A man in a wool coat and red leather gloves, holds a black umbrella, keeping the falling snow off of his head.

Wool Coats

  1.  Set your washing machine to the delicate cycle, and choose the shortest wash time and cold water setting. If your coat is black or a dark colour, and you have previously washed your normal clothes with a powder detergent, run a rinse cycle of your washing machine before putting your coat gently inside. This will prevent any detergent residue from showing up on your coat.
  2. If there are any visible spots on the coat, apply full strength Eucalan directly to them prior to washing.
  3. Add the contents of one pod or a few capfuls of Eucalan Delicate Wash in your favourite scent. Eucalyptus is a great choice for natural moth-repelling properties.
  4. Hang the coat to dry away from heat or bright light – a shower is often good for this. If the coat comes out of the washing machine and is dripping wet, gently roll it in a light coloured clean towel to absorb excess water. Never put your wool coat in a dryer or close to any heaters – it will shrink!
A Black woman with long black hair poses facing the camera, smiling, wearing a black coat with a faux fur hood. Behind her is a snow neighborhood.

Faux Fur Coats

  1. Set your washing machine to the delicate cycle, and choose the shortest wash time and cold water setting. If there are any visible spots on the coat, apply full strength Eucalan directly to them prior to washing.
  2. Add the contents of one pod or a few capfuls of Eucalan Delicate Wash in your favourite scent.
  3. Hang the coat to dry.
  4. Brush the faux fur with a soft bristled brush (like a baby hair brush) to help smooth the faux fur.  If your faux fur is looking a little flat, you can steam the faux fur coat to fluff up the fur again. Do not apply a garment steamer directly to the surface of your faux fur, but you can hold it near the fur while pressing the steam button, and allow the steam to pass over the surface while you use your other hand to fluff the fabric.

At the end of the season, don’t pack your coat away without a final wash. A little extra effort will ensure that whatever is lurking on the coat doesn’t attract bugs or turn into a stain over the warmer months. Washing your coat before putting it away until next winter will ensure that when you need it again, it will be ready to go!

We hope these tips will help you care for your winter coat and keep it at the ready. Want more of Eucalan’s laundry tips? Check out our Laundry Lessons Pinterest board!

Like this post? Pin it!

Laundering and Mending Your Woolens with Eucalan

The original version of this post appeared on our blog in August of 2018. We’ve updated it a bit!

Autumn has fallen, there’s a chill in the air and we know you’re ready to pull out your cozy woolens to get them ready for wear! Whether your sweaters and accessories are handmade or store-bought, we’ve put together our top tips for keeping them looking beautiful (and smelling amazing) for years to come.

A stack of wool sweaters in autumn colors (warm browns and oranges).

We recommend laundering your sweaters at the end of each spring, before you pack them away for the summer. This cleans them of any oils from your skin and makes them less palatable to moths and other fibre-loving insects. However, if you’ve missed that step, there’s no time like the present to launder your woolens.

Fill a basin with tepid water and add a capful of Eucalan Delicate Wash or the contents of a single use pod. Add your sweater and let sit for 20 minutes, then remove your sweater, gently squeezing to release excess water. You don’t want to wring your sweater – this will only pull it out of shape. Wrap it in a clean, dry towel and press gently to release more water.  Lay flat to dry on another clean dry towel, gently pressing into shape. Dry away from heat and direct sunlight. 

If you washed your sweaters before packing them away for the season, now is the perfect time to pull them out and freshen them up for wear!  To get rid of creases and reblock your sweaters for wearing, you can skip the full wash. Instead, spray block your sweaters by lightly misting them with a spray bottle filled with a dash of Eucalan and cool water. Then press your sweater gently into shape and let dry.

De-Pilling

Given enough use and wear, even the nicest sweaters and woolens will start to have little balls of fibre appear. Pilling occurs when loose fibres push up from the fabric, eventually gathering in small balls – simply washing and wearing can cause this! You can remove these pills using a variety of tools: a Sweater Stone, a Gleener, or a fabric comb. We have a great video that demonstrates how to de-pill a sweater.

A black woman's hands are seen using a sweater stone on a peach colored sweater.

Mending

Even with the best care, sweaters and other woolen items may develop holes over time. With a little creativity and ingenuity, you can mend these items and continue wearing them! If you find a defect along a seam, or while you still have some of the original yarn used in the project in reserve, you may be able to mend your item invisibly. If neither of these are an option, however, you may consider visible mending.  

A woman wears a cabled white sweater and on the back, over her left shoulder, are embroidered flowers.

Visible mending is a new hot trend where you repair your garment using bright, fun colours or designs so that the mending itself becomes a feature of the garment. We found a great photo tutorial of mending for knit sweaters at Collingwood-Norris Design.

Interweave also has a couple of useful posts on visible mending. The first post has some tips and tricks on how to visibly mend your garments, though they focus on a pair of jeans rather than a sweater. The second post focuses on spinning yarn for visible mending. Either way, the steps are fairly similar:

  1. Gather your tools. You will need: sharp scissors, a tapestry or embroidery needle, yarn or thread (various colours and weights depending on the yarn used in the garment), a flat surface for working, DPNs (double pointed needles) in the appropriate size for picking up stitches. You may also want to invest in more specialized tools like a darning egg or a Speedweve-style mending loom.
  2. Lay your work out flat. Make sure you’ve got your garment laid out flat on a working surface in front of you. The garment shouldn’t be held taut, but rather laid out how you would block it. Isolate the areas in need of mending.
  3. Pick up stitches and trim loose threads. You want your working area to be clean and neat. Where possible, pick up stitches using your DPNs to stabilize the stitches from dropping further and making the hole grow bigger. Trim any long threads that might get in your way while you are working; shorter threads can be trimmed after you mend.
  4. Decide on your mending process and start mending. There are a variety of ways to mend holes in garments. If you are picking up stitches on a fraying edge, you may wish to reknit that section. If you are darning a hole in an elbow, you may wish to weave a patch using needle and thread, much like you would darn a sock. Or you may choose to embroider the edges of the hole, or over the hole completely if it is small. 

If you’re looking for more resources on visible mending ideas and stitches there are a variety of books on Amazon as well as an article in one of the recent Mason-Dixon Field Guides, and the inspiring Tom of Holland’s The Visible Mending Programme. We also have a Pinterest board dedicated to visible mending.

White hands are seen mending a brown sock. In the background sits a colorful basket of threads.
  1. Weave in and trim your ends. Once you have finished mending, you want to weave in your ends. This includes some of those shorter ends from the beginning, if you haven’t already worked those into your mending. Make sure everything is snug and secure so nothing pulls loose later on.
  2. Launder your garment.  When you’re done, you may wish to launder your garment again. Follow the instructions we listed earlier in this article to wash and block with Eucalan Delicate Wash.

We hope this post has helped you get excited for fall and for wearing your warm woolens again! 

Like this post? Pin it!

A woman wears a cabled white sweater and on the back, over her left shoulder, are embroidered flowers. Over the photo it says "Laundering and Mending Your Woolens"

Save the Girls – Breast Cancer Awareness

October is Breast Cancer Awareness Month, a US-based campaign to raise awareness about breast cancer. The emphasis is on ensuring that everyone has access to the screenings they need and resources they deserve. We encourage all our readers to get regular mammograms and conduct their own monthly self breast exams to detect potential cancers early.

A banner for Support the Girls 2022 Fashion Show on Thursday Oct 20th.

Eucalan is also delighted to support the Victoria’s Attic Support the Girls Fashion Show scheduled for October 20, 2022 by donating gifts for the VIP section. The event has grown over the years to become a “must-attend event” to raise money for the Grande Prairie Regional Hospital Foundation to support those who face breast cancer. It is estimated that Canadian women have a 1 in 8 chance of developing breast cancer in their lifetime.

Support the Girls was started by Victoria’s Attic owner, Alison Gustafson to support those dealing with breast cancer in the Grande Prairie, AB area. 

“The mission of the Support the Girls event is to…provide meaningful, ongoing support to those who always support us,” says Gustafson. “Our hope is to make our girls’ numerous hospital trips a bit more enjoyable, less clinical, and a whole lot more supportive. We want them to feel like they have the support of their entire community.”

Victoria’s Attic is a lingerie and clothing boutique that serves the Grande Prairie area. They also have a special focus on providing lingerie, clothing, swimwear and breast forms to those who have undergone mastectomy. We at Eucalan are dedicated to supporting such a worthwhile cause.

—–

A clothesline strung against a rugged mountain background with hundreds of bras hanging off of it.

In addition to monthly self breast exams and yearly mammograms, we like to take October to reflect on our current bra collections with an eye towards donating those gently used but seldom worn bras to those in need. For many women, finding a bra that fits can be a challenge, but for someone who is unhoused, simply finding a bra can be difficult. Normally, during August (#Braugust) or October we clean and organize our lingerie stash and identify which bras could be passed on to those in need. 

If you’re interested in participating, collect any gently used bras and use our tips to launder them in Eucalan Delicate Wash. Then check out Free The Girls, a 501(c)(3) organization that collects donations of gently used and new bras, and then distributes them to women who have been victims of human trafficking around the world. These bras are sold by the women, providing income to support their families, educate their children, and create the foundation for a new life of dignity and self-determination. Donations are accepted by mail, or you can drop them off at locations throughout the US and Canada!

Like this post? Pin it!

A photo of a woman wearing a black lace bra with text that reads "Support the Girls - Breast Cancer Awareness"

18 New Patterns for Autumn!

Autumn officially starts next week and we couldn’t be more excited to dive back into crafting gorgeous garments and accessories. September is the most exciting time of the year, when all the new patterns debut and “castonitis” is at an all time high. Whether you knit or crochet, we’ve rounded up some of our favourite new looks for this season! 

Cozy Autumn Sweaters

One of our favourite traditions is to knit or crochet ourselves a new sweater for the winter months ahead. And with so many new patterns to choose from, it’s hard to narrow it down to just a few choices! 

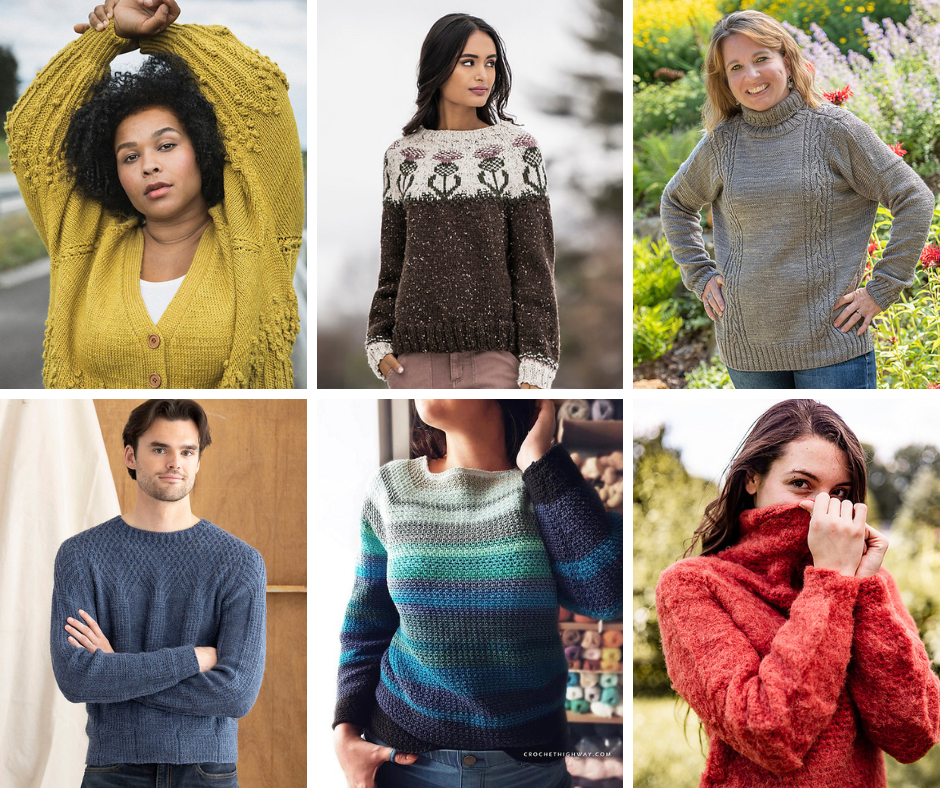
A collage of sweaters: a yellow cardigan with bobbles; a colourwork yoked sweater; a cabled  gray turtleneck; a man wearing a cabled blue sweater, a scrappy, stripey crochet raglan all in blues, a fluffy persimmon colored zip up pullover.

For the knitters: Choose from a cardigan that evokes wandering in a meadow, or have a little fun with colourwork. A cozy turtleneck is a classic choice and this year we’re seeing more patterns for men too! 

For the crocheters: Got a lot of scraps in your stash? Turn them into a fabulous sweater! Or get cozy with a zip-up pullover with lots of texture.

Fun Fall Shawls

Shawls make great accessories to an outfit, and add lots of warmth on those chilly days. Plus they’re just plain fun to make!

A collage of shawls: a gorgeous red cabled triangular shawl; a squishy garter stitch shawl striped in pink and green; an apple green shawl with diamond lace; a rectangular geometric slip stitch wrap in shades of blue; a granny square crochet shawl in brights pinks, purples, blue and yellows; a yellow triangle crochet shawl worn like a bandana.

For the knitters: This season you’ve got your choice of cables, squishy garter stitch, lace or mosaic (slip-stitch) patterning. 

For the crocheters: Grab your hooks and hop aboard the granny stripes train – so hot this year! Looking for something soothing? How about a one-row repeat with a fun border!

Accessories and More

Chilly days call for warm, woolies! Whether that’s hats, mits, socks, or cowls, we’ve got you covered. And we couldn’t resist including a pretty pillow to add some autumn touches to your coziest spot at home!

A collage of accessories: an orange and teal colourwork hat with earflaps;  dusty purple cabled wristers (fingerless mitts); green socks with a cabled panel; cushy white and orange crochet socks; a bandana style cowl crocheted in shades of pale pink and sage green; a colourful pillow made out of granny squares and puff stitches in colors of cream, gold and burgundy.

For our knitters: A colourwork beanie with optional ear flaps? Yes please! Or a quick set of wristers that make a wonderful gift. And don’t forget the toes – they’d love some wooly warmth too.

For our crocheters: Cozy, squishy socks are perfect for cuddling up on the couch with a good book. Or whip up a quick cowl to keep the chill off your neck. And oh that gorgeous pillow!

We hope there’s a little something for everyone here, but if you don’t see a project that calls your name, we’ve got Pinterest boards full of knit and crochet pattern inspiration!

As you’re crafting this autumn, don’t forget the perfect finish: a spa treatment in Eucalan Delicate Wash. We’d love to see what you make this season – tag us in your photos with the hashtag #eucalanfan!

Like this post?

Pin it!

A woman wears a fuzzy red crochet sweater with the turtleneck pulled up over her mouth and nose.

A new FREE pattern from Eucalan: Clapham Shrug by Jill Wolcott

We’re thrilled to announce that we’re now offering a new pattern, the Clapham Shrug by Jill Wolcott, for FREE when you sign up for our newsletter. Today we’re featuring an interview with Jill, and chat about her design inspiration. Keep reading to learn more!

A red-headed woman poses in a garden wearing a lacy pink handknit shrug.

An Interview with Jill Wolcott:

Q: How did you come to knitting and designing?

A: I came to knitting through design. I went to technical school for pattern making and garment construction, then moved on to my design education. I was primarily a sewer, although I knit an occasional sweater.  

After a move to a new city, I found myself needing a focus as I couldn’t find a job. I saw a knitting machine, and spent the next eight years learning knitwear and designing. In about 1994 I began knitting by hand in my off hours and found so much satisfaction in it that I started to do both hand and machine knitwear design.

We moved to San Francisco in late 1998, and I never again had room to have my knitting machines in operation. By that time I was really only interested in hand knits, so I transitioned. I also started teaching at FIDM as a regular part-time instructor. I taught in both the design and product development areas, in course areas that balanced my creativity and technical expertise. I loved guiding students through their personal and professional growth, and I loved finding ways to share my knowledge and my enthusiasm for being a creative person.

We moved to Seattle in 2016 and I no longer teach except for my own business (online). I love to teach (don’t love the prep as much!) and to help knitters and knitwear professionals grow. I teach grading for knitwear which is a much-needed specialty as we expand sizing.  I have always focused on fit and that is an integral part of my design, and how I teach.

Q: What are your favourite techniques and projects to design?

A: My favorite technique is generally whatever I am focused on at that moment.  Fit is crucial to my design point of view, whether designing accessories or garments. I am now focused on creating patterns that can be Any Size.Any Gauge. These are based on spreadsheets that my colleague Jamie and I build (mostly she does the building and I am the design and fit brains).  This work allows me to design a shape, then refine how we can make it fit a variety of bodies based on individual measurements. Right now I am also working on updating my sizing tables to reflect new numbers available for both Missy and Plus size bodies, including those over 55.  It is a job in itself!

I love working in a collaborative environment. I work solo, but love doing collaborations with other designers, yarn companies, and especially with someone like Jamie who shares my fit interest, but comes at it from a completely different background. I am working on a book distilling all I’ve learned, Sweater & Life Adjustments, In 15 Lessons.

Q. What are some of your favourite designs?

A: I became obsessed with drop stitches about four years ago and I’ve done lots of things using them.  I mostly love creating things that fulfill whatever my design vision might be.  A few of my favorites are found in the Amalfi Collection.

Photos of patterns in the Amalfi Collection: A blue scarf with dropped stitches, a fall wrap/capelet in red and orange with pops of green, a red cowl with white and black accents, and a a lacy purple cowl in layers.

Q: What was your inspiration for the Clapham Shrug? Did you start with the stitch patterns, or the yarn, or the idea of a shrug first?

A: I started with two skeins of the same, but different intensities, of yarn that I wanted to design something in.  The dyer has a goth/punk vibe, so my mind went to Vivienne Westwood.  Clapham Road is where her first London shop was. I recreated a stitch pattern from a sweater I bought that I love, then worked out how to make two sleeves that buttoned together.  

I loved the result, and I felt that it would work in another type of yarn and have a different, but still Vivienne Westwood inspiration, so I did the lace weight version. Instead of two skeins, we worked from both ends of a skein, so the yarn plays out differently in the two pieces. Coordinated, but not match-y.  I say we because the Clapham Junction sample was knitted by Judy Ellis of Handworks, Ltd. who does most of my sample knitting.

Inspiration is always hard to pin down. I like the idea of shrugs, but they are a difficult fit for many bodies. I feel like the Clapham Shrug works because it only seeks to create a yoke and sleeves. The way it is buttoned together can be varied for different looks. I love buttons, so this allowed me to dive into my collection of vintage and other buttons.  I always look in my drawers before I go look for new ones. The buttons on the DK version are substituting for ones I couldn’t find (a chronic problem for a creative person). I ordered them online in the early months of the pandemic and I was delighted when they arrived.  They are not as awesome as the others (I did eventually find them!), but a little younger, which suits the yarn.

Q. What’s a question you wish I asked?

A: There are a few things I’d love to add here!

Notes on Blocking

I think it is appropriate to talk here about blocking and caring for your hand or other knits. I both wet block and steam block both my swatches and finished knitting. Wet blocking allows the yarn to relax into what it will be, and steam blocking gives a little extra polish to the fabric. If you’re looking for a few tips and tricks, I do have some Steam Blocking Videos you can check out.  

I wash my hand knits in the gentle cycle of my washer. If there is a question about agitating them, I simply let them soak, spin out the water, then lay them out. That is also what I did when I had a top-load machine. I don’t send any of my knits, including my husband’s, to the dry cleaner.  Washing will generally improve them!

But you need to know what will happen, which means getting knowledgeable about fiber content, yarn structure, and color fastness.  If you have a swatch, try out blocking method(s) on the swatch; it should give you a fairly good idea of what will happen when you wash the finished product.  

Did you know that cashmere loves to be washed?  Take the money you will save on dry cleaning and use it to buy better quality cashmere.  I have sweaters that are more than 20 years old that are still fabulous.  Less expensive versions didn’t hold up or were scratchy to my skin.  

Super wash merino grows quite a bit when introduced to water, so blocking can be a little scary.  A quick spin in the dryer to remove water and remind the fibers to contract will give the best result.  If you didn’t block your swatch you may be very surprised at the end result.

Fibers that your skin finds scratchy will generally not improve over time or by treating with softeners. So indulge in things you can wear for a long time, enjoy working with them as you make things, then enjoy them into the future as finished pieces.  Your cost per wear will definitely balance out over time!  For kids, yeah, grab that durable, washable yarn. They are not going to wear it that long.

Notes on Sizing

I am also passionate about sizing and fit. I ended up knowing most of what there is to know about grading, sizing, and fit, so I teach professional development classes. I am embarking on a new pattern format (Clapham is one version) which allows the knitter more control, and allows me to do less pattern writing. Ultimately I am seeking to provide patterns that will fit any body within a specific design. My lovely colleague Jamie builds amazing Excel work books to figure everything out.  Sign up for my newsletter and read about my sizing adventures on my blog. I am leading a Sizing [R]Evolution, the purpose of which is to get away from categorizing, to teach about your individual body, and to make designs that work for nearly everyone. 

My Website is full of Amazing Things!

I have a type of dyslexia where I have a hard time with directional cues and cannot flip things in my brain as quickly as I want to. Also, I mix up numbers. Oy. As a result, because of issues I had with standard charts, I came up with a charting system called Action charts. It is WYSIWYD (what you see is what you do), so instead of representing the right side of the knitting, it shows you what you are seeing or doing. Purls are always purls, knits are always knits, etc. It has given a lot of knitters access to charts that could not previously suss them out.

You can find a few of my favorite tools on my website linked below:

Thanks to Jill for taking the time to answer our questions!

The Clapham Shrug

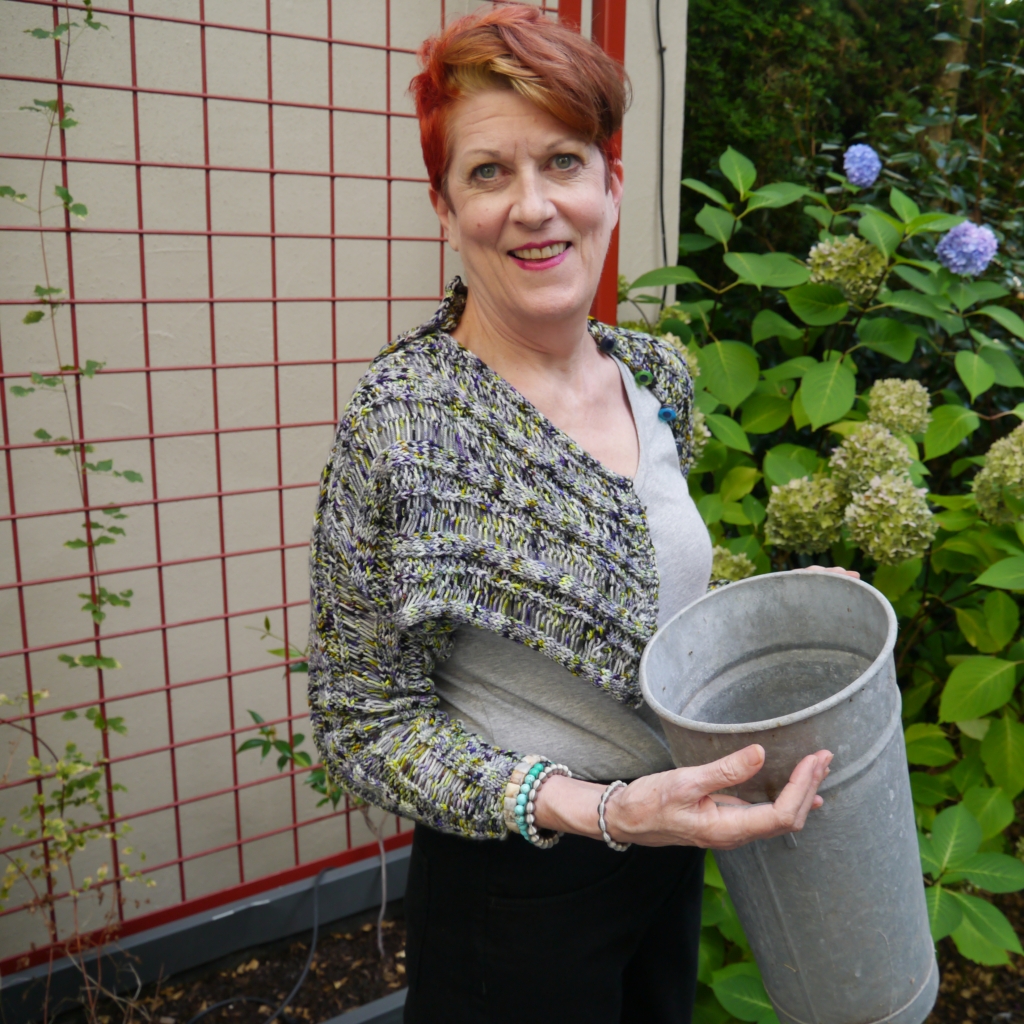
A red-headed woman wears a purple and grey shrug, with pops of yellow/green. She stands in front of a similarly colored hydrangea bush holding a french flower bucket.

A few details: The Clapham Shrug includes the 2 latest patterns from designer Jill Wolcott. Featuring her “any size, any gauge” technique, this sleeve and yoke combine and button together to make a shrug you can knit in laceweight (Clapham Junction) or DK (Clapham Road). Both patterns are included together in one PDF along with schematics, written charts, and worksheets to help you knit the perfect size. You’re going to love this new autumn knit!

Yarn: Squish DK from Fiona Kay Knits (Clapham Road); Meridian from Anzula Luxury Fibers (Clapham Junction)

Needles: US2/2.75mm and US 4/3.5mm (Clapham Road); US2/2.75mm and US 3/3.25mm (Clapham Junction)

Download your free copy when you sign up for our email list today!

A red-headed woman stands with her back to the camera, showing off a delicate pink lacy handknit shrug.

We hope you enjoy the pattern and can’t wait to see your versions! Please share them with us on social media using the hashtag #eucalan.

Like this post? Pin it!

How to Wash a Wedding Dress with Eucalan

You spend hours searching for the perfect dress: looking through magazines, figuring out your style, the details you can’t live without and then finally deciding which dress was the right one for you. But now your wedding day has come and gone. Luckily, you have a multitude of photos and memories to always remind you of your special day. To remind you of how beautiful you looked in your wedding dress and how it made you feel.

A collection of wedding dresses hanging on a rack, in different colors (white, ivory, champagne) and different fabrics (lace, satin, tulle).

So now it’s time to properly care for the garment that you so meticulously chose for your big day. It can come as a bit of a surprise when your beautiful dress has a dirty hem, grass-stained train, or cake-speckled bust.  And while you may not want to wear your dress again, you do want to clean and preserve it so it will keep it looking beautiful for years to come.

Preservation kits can run you anywhere between $250 and $400. Though some dry cleaners offer specialized wedding cleaning services, they are expensive. They also use harsh chemicals that can damage delicate embroidery, sequins, and beadwork.

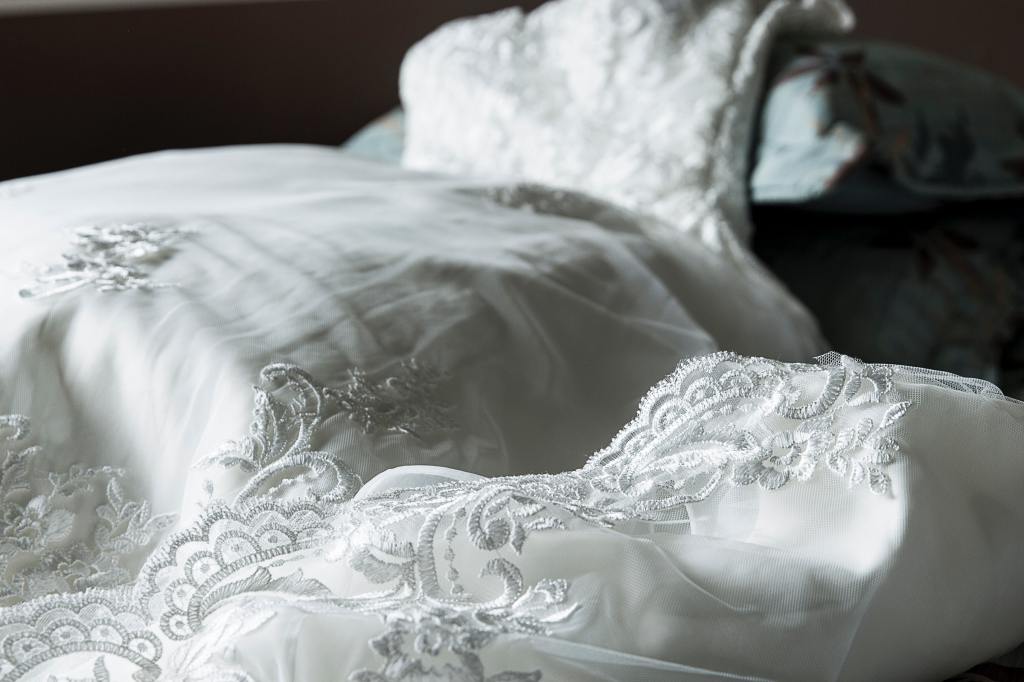
A white wedding dress laid out on a chaise lounge, the camera is focused on the  delicate embroidered lace that adorns the hem and train.

But did you know that you can actually clean and preserve your wedding dress yourself? No one will take more care in cleaning your own dress than you. By using Eucalan, the process is far less expensive and significantly better for the environment. Eucalan is non-toxic, biodegradable, free of optical brighteners, phosphates, synthetic fragrance and dye – so it’s a perfect choice for ensuring the preservation of your wedding dress for years to come.  

Washing your wedding dress is so much easier than you’d think! We can walk you through the whole process step by step:

  1. Add Eucalan to your washing machine or bathtub filled with tepid water.
  2. Immerse your dress in the water and allow it to soak for 15 minutes.
  3. Add Eucalan full strength (straight from the bottle, not diluted in water) to tough stains and rub gently with a soft bristled toothbrush until stain disappears. Your train and hem will likely need the most effort.
  4. Squeeze your dress gently with your hands to incorporate soap and water through the fabric.
  5. Soak the dress for an additional 15 minutes.
  6. Eucalan does not require rinsing, but if you wish to, give it a gentle rinse under fresh tepid water.
  7. Remove from water and squeeze gently or spin out excess water.
  8. You may roll your dress in a fresh, clean towel, but be sure to go slowly and so any embellishments don’t stick to your towel fibres.
  9. Hang your dress to dry, away from direct sunlight or heat.
We see a bride in a wedding dress, holding a bouquet of pink colored roses. The back of her dress is delicately beaded, and satin ribbons lace up the back.

If you are still counting down the days to your wedding, it’s worth keeping some Eucalan stain treating towelettes in your emergency bag. These handy wipes make it quick to clean up any little bits of make-up, food, or grass and such from outdoor photo shoots. Give one to each member of your wedding party, as well – catch stains before they set to keep everyone looking their best!

We hope we’ve given you some tips and tricks on how best to clean and preserve your treasured dress. If you love all things wedding related, you should also check out our Wedding Pinterest Board!

Like this post?

Pin it!

How to wash a wedding dress with Eucalan: A wedding dress hangs on a hanger against a mushroom colored wall. The bodice is large flowery lace, and the skirt is tulle.

5 Ways to Ease the Back to School Transition

This post originally appeared on our blog in August of 2021 but we’ve updated it to make it more relevant to you today!

Even though we’re enjoying these last few long days of summer, school bells will be ringing before we know it. While many things have not changed (sharpen those pencils, get those spiral-bound notebooks ready!), your “back-to-school” routine comes with new challenges each year. Today we’ve collected 5 tried and true tips we hope will help you prepare for the new school year ahead!

Tip #1: Adjust that bedtime routine.

Getting a good night’s sleep is vital to your children’s success at school. While summer breaks may have meant later bedtimes, there’s no time like the present to try and readjust to a healthy routine. Young children (ages 6-12) need anywhere between 9 and 12 hours of sleep a night. Even those teenagers (ages 13-18) who like to stay up late could use a solid 8 hours of sleep (and 10 is better). Start your evenings by dimming the lights, turning off electronic devices and limiting caffeine. If your children respond to scents, try using Eucalan in our Lavender scent to launder bed linens. Lavender essential oils aid in relaxation and can also improve the quality of their sleep.

A bottle of Eucalan Lavender sits on a wooden railing, along with delicate lilacs.
Two children wearing knit sweater nap next to each other on a bed with grey sheets.

Tip #2: Stock up on school supplies.

Get your homework stations ready, and provide your kids with all the supplies they’ll need for the school year. Check with schools first to see if they have any school supply lists. Many students will need access to a computer or tablet to complete lessons and/or homework assignments. Headphones are a must so everyone can listen to their own content without disturbing others. Then stock up on supplies appropriate for the age of your student, like ​​pencils, erasers, pens, calculators, crayons/markers/colored pencils, glue sticks, paper and notebooks. If you want to keep supplies tidy, check out our Back to School Pinterest board for ideas on homemade or upcycled caddies.

A white desk draw is open revealing a number of different kinds and colors of pencils. The desk drawer rests lightly against a yellow chair.

Tip #3: Create a comfortable, distraction-free study space.

Whether it’s buckling down and starting homework, or trying to engage in virtual learning on a cold weather day, your student needs a place where they can concentrate on their schoolwork.  If your living space permits, it’s best to create a permanent work space. A dedicated space gives your student a place that feels comfortable and familiar while escaping the hassle of constantly shuffling supplies. We perused Pinterest and found tons of great inspiration for workspaces, including 35 Homeschool Room Ideas for Small Spaces from Homeschool Superfreak. The ones below are our favourites for repurposing small spaces into lovely learning environments.

A collage of two study areas. On the left, a closet has been turned into a homework station complete with computer, desktop for working, and baskets of school supplies. On the right, a small area on a landing has been turned into three school stations complete with bulletin boards, supplies, comfortable chairs and room for laptops.

Tip #4: Create a morning checklist.

Let’s face it, after summer camp and vacations we’re all rusty at packing up supplies and ensuring we have everything we need. Create a quick morning checklist that can live on the fridge or a whiteboard. Include items to pack like homework, notebooks, water bottles, lunches or snacks, computers or tablets, their charging cords, clothes and equipment for extracurricular activities, and anything else that can be easily forgotten. 

A bulletin board with colorful Back To School, Monday and Tuesday signs pinned to it.

Tip #5: Maintain that flexibility.

The past few years have taught us that we have to roll with the changes, and no one is more resilient than our children. Try modeling an open mind and flexibility as situations and plans change. Encourage your child to communicate openly with teachers and school administrators about questions and concerns and, if necessary, help them find counseling or other opportunities to maintain their mental health. Speaking literally, everyone benefits from some physical activity and flexibility. Keeping limber with yoga or taking a short walk outside does wonders for the mind, body and spirit and can help build reserves to draw on in stressful situations. 

A father and son bike together on a marked bike path, along pedestrians strolling with a Ferris wheel in the background.

We hope we’ve given you a few ways to better prepare for the school year. Do you have more ideas? We’d love to hear from you in the comments below, on Instagram (@eucalan or using the hashtag #eucalan) or in our Facebook Group!

Like this post? Pin it!

From the back, a small child in a yellow raincoat with a blue backpack walks away from us.

5 Tips to Organize Your Crafting Space

If you love to craft, chances are you have a healthy stash of supplies that you love using. The challenge is creating a work space that is beautiful and inspiring, while keeping your supplies neat and tidy so you can find them when you need them! Sometimes that project alone feels overwhelming. So we dove into Pinterest to find some of the best tips and tricks for organizing your space to turn it into your dream crafting environment. Keep reading to find out more about what we found!

Create a Workspace

A collage of workspaces: on the left a white Ikea table, with storage underneath and two stools; in the middle a large tabletop with storage underneath displaying a rainbow of fabric; on the right a desk inside a small closet.

No matter what your chosen craft, you need a space where you can work. This could be a larger table for fabric cutting or assembly, or a smaller desk for a computer or a sewing machine. Either way you’ll need a flat surface where you can work. We love this Ikea hack from Landeelu where she takes a table top, some legs, and adds extra storage with a square shelving unit. Or check out The Little Green Bean’s DIY Craft Room Island for a cutting table, sewing space, and fabric storage all in one. If space is tight, use what you’ve got. This gorgeous space from Beneath My Heart creates a flat surface and storage in an unused closet. Remove the doors to keep the space open, or leave them on to hide things away!

Think Vertical

A collage of photos using vertical space: on the left, a yarn wall made of pegboard, screws and cakes of yarn; in the middle diagonal shelving holds a variety of colorful yarn; on the right a pegboard wall holds ribbons, threads, paint, scissors and more in a rainbow of colors.

Some of the best storage can be vertical! Your walls, the backs of doors, bookcases, and more can be great ways to store materials within eyesight, while making use of wasted space in a room. Want yarn storage that is also an art piece? Try creating an incredible yarn wall using this tutorial from HeartHookHome. Or add shelving units above your workspace like RepeatCrafterMe to create a beautiful, and functional, tableau to inspire you while you work. If you’re struggling with a small space, the secret to wall storage is a pegboard. Check out these gorgeous ones curated by That’s So Gemma for more inspiration.

Do-It-Yourself or Thrift

A collage of DIY/Thrifted Items: on the left, a metal locker holds yarn in a variety of colors; in the middle, a shower caddy is repurposed to hold wrapping paper, ribbons, scissors, cards and gift tags; on the right wooden crates are stacked to create a storage space which holds a variety of yarn.

If you’ve got a craft room in need of organizing with next to no budget, you can likely create the craft space of your dreams with Do-It-Yourself projects or thrifted items. We love this AMAZING wool locker that WoodWoolStool found. And check out how Better Homes and Gardens upcycled a metal shower caddy into the perfect gift wrap and card writing station! You can likely find bookcases or unused bureaus at garage sales and thrift stores for very little – add paint or contact paper to make them match your decor, or just use them to keep your craft supplies tidy and out of sight. If new furniture isn’t in the cards, create your own. How cool are these DIY crate shelves from the Make & Do Crew?

Find a Place for Everything

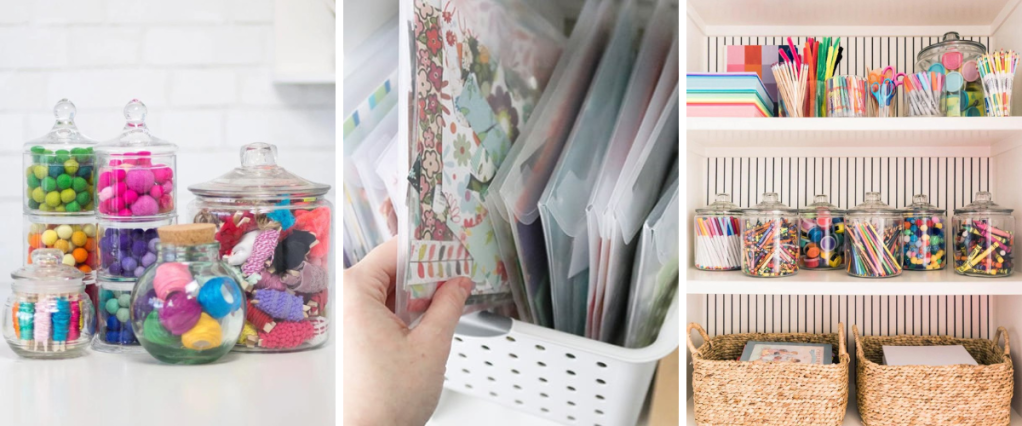
A collage of storage solutions: on the left, glass jars hold pomoms, scraps of rickrack and more; in the middle plastic envelopes in a bin hold paper scraps; on the right glass jars and baskets hold crayons, paper, markers, paints and more.

This one is harder because it involves cleaning and organizing what you have (more about that next). But as you start to build out your craft space, make sure that everything has a place it belongs. Items will be easier to find when you need them, the space will allow you to see what you have, and you’ll always have a place to return things to. In addition to pegboard walls and shelves, think about how you can store bits and bobs and leftovers. How beautiful are these glass jars filled with pompoms, rickrack, and leftover bits of ribbon and yarn from Sweet Red Poppy? And this tutorial on organizing scrapbook paper scraps from Aubree Originals would also work for sewing or knitting patterns, or other paper crafts supplies. Even if you just want to better organize your children’s art supplies, a few shelves in a closet, some glass jars and baskets can do the trick – check out how Rachel Parcell created order out of chaos

Cleaning and Organizing

We’ve covered lots of tips and tricks for organizing over the years that we think can help you if you’re overwhelmed by the project. 

  1. Take Inventory – We know every crafter has tons of supplies. It’s time to see what you have! Gather up all of your supplies together in one place. Don’t overthink it – just grab them all and bring them somewhere that you can get comfortable to do some sorting and evaluating. 
  2. Start Sorting – We invoke Marie Kondo quite often, but we’re really taken with her idea that what you have should spark joy. Start looking at your supplies and see what you’re still inspired by most – definitely keep those! Then look at items where your tastes may have changed, or you may have moved on to pursue other crafts. If these items are still in good shape consider donating them to a good cause (a retirement home, schools that might be looking for art supplies, etc.). If you find anything that seems at the end of its useful life, it’s time to toss it.
  3. Cleaning – While you’ve got your shelves and closets emptied and bins turned out, it’s time for a good deep cleaning! And this is where Eucalan Delicate Wash can help. Vacuum all areas you can and, if you find any stains or spots on the carpet, check out Freshen Up Your Home with Eucalan for tips on removing them using Eucalan. Create a diluted solution of Eucalan and water in a spray bottle and use it and a cloth to wipe down any flat surfaces (shelves, drawers, work tables, etc.) and dust. You might as well start organizing in a clean space! 
  4. Start Organizing – Start putting items away and arranging them in a manner that seems logical to you. Gather like weights of yarn together, organize paints or fabric by color to create a beautiful rainbow spectrum, and start finding a space for everything. If you’d like to label your containers wait until your reorganization is complete – you never know when you might swap out a bin here or there and you’ll only want to label once!

Craft Spaces We’re Drooling Over

Two inspiring workspaces: on the left a room with a big wooden table and two yellow stools, a huge pegboard holding yarn, thread, paints and more looms behind, on the side wall fabric is arranged in a rainbow of colors in low shelving; on the right a small sewing corner with a white table with sawhorse legs, a yellow lamp, a sewing machine and a rainbow of fabric, scissors and threads on the wall.

Whether you’ve got a small or large space, we hope we’ve given you a few ideas on how to clean, organize and build the crafting space of your dreams. And we’re not done – we’re still collecting ideas on our new Pinterest board – Organizing Your Craft Space. We’ll leave you with a few craft spaces we would love to spend time in!

Like this post? Pin it!

A craft room with a tiger painting on the wall, a comfortable yellow chair, a small desk on sawhorse legs next to shelving that holds a rainbow of art supplies.